Systems Management Server Installer Tools
Before we go into the
details of actually using the SMS Installer utility, let’s look at the
tools that SMS Installer uses to create and customize the SMS Installer
executable files. To create and customize the installation scripts, SMS
Installer uses two interfaces: the Installation Expert and Script
Editor.
Installation Expert
The
Installation Expert automatically creates a basic installation script
using the reference computer’s configuration. The installation script
contains commands that perform the actions necessary to carry out the
installation.
Once the basic script
has been created, you can use Script Editor (discussed in the next
section) to customize the installation script for specific user
functions. However, you’ll find it much easier to generate the
installation script using the Installation Expert. This technique allows
you to create a basic installation script and switch between the
Installation Expert and Script Editor to perform modifications. This
approach also prevents potential loss of data that can occur if you
initially create the installation script using Script Editor and then
switch to the Installation Expert. The Installation Expert provides two
methods for packaging script files: the Repackage Installation Wizard
and the Watch Application Wizard. The application for which you’re
creating the script file will determine which of these wizards you’ll
use. The Installation Expert also provides several other tools to test
and compile the installation script and to run the installation package.
We’ll look at each tool in the following sections.
Repackage Installation Wizard
If the application
you’re attempting to install currently contains a setup file, you might
need to repackage the setup file along with the source files and any
other support files for distribution to the target clients. You use the
Repackage Installation Wizard to accomplish this task. In a
single-computer environment, installation of an application typically
requires running a setup program. More often than
not, during the installation you’ll be asked for specific input
concerning the setup. For a single workstation setup, this situation is
fine. When we talk about distributing these applications to hundreds of
users and we want to have control over the input selection, however, we
need to provide the input to the setup by some other means. The
repackaging process allows us to provide the answers to installation
questions and set specific configurations that will apply to all our
client machines. When we run the Repackage Installation Wizard, the
reference computer is monitored for changes and a script file is
generated from the changes made during setup.
Watch Application Wizard
You can use the Watch
Application Wizard to create a customized installation file for those
applications that don’t have their own setup programs by “watching” the
files used while the application is run and creating a script from them.
In many cases, such as with custom or proprietary applications, a setup
file hasn’t been created for the application, and we’re faced with the
problem of how to successfully distribute the application to the
clients. The Watch Application Wizard creates an SMS Installer–generated
executable file that’s used to install the program and all its
supporting components, such as DLLs. The wizard runs the existing
application on the reference computer and tracks the files being used by
the application. Using this list of files, an installation script is
created for the application.
The Watch Application
Wizard is also useful for applications that make calls for Microsoft
Visual Basic support files or run-time files. The repackaging process
will catch all the application files, but not necessarily those called
from outside the application directory. In this case you can use the
Watch Application Wizard to look for these files and add them to the
installation script for the application.
Compile
The SMS Installer
compiler is used to create the self-extracting installation file. After
you have created your installation script and made all the necessary
modifications to the installation attributes, the script file is
compiled into an executable file. This SMS Installer–generated file
contains the script and all the necessary application files. It’s the
final file that’s distributed throughout your organization.
Files created at compile time include the following (Testapp represents the file name you provided):
Testapp.exe The installation executable, including the script and all necessary application files in a compressed format.
Testapp.pdf and Testapp.sms The
standard SMS package definition file used to distribute the SMS
Installer–generated file to the target computers through SMS package
distribution. Two versions of this file are created: one with the old
.PDF extension used with earlier versions of SMS and supported in SMS
2.0 and one with the new, preferred .SMS extension adopted by Microsoft
to avoid confusion with other market applications that use the .PDF
extension.
Note
These
files are created only if the Create Package Definition File option is
selected in the SMS tab of the Installation Interface dialog box. |
Testapp.ipf Text version of the installation script used when making modifications to the script through the SMS Installer utility.
Testapp.wsm Additional working file used by the installation script to maintain changes made to the script before it gets compiled.
Test
You use
the Test tool to test the installation executable file without actually
installing it. By running Test from the Installation Expert, you can
preview how your setup script will actually run. Are the correct menus
presented? Does the installation run unattended? These are the things we
can test locally before distributing the installation package.
Keep in mind that
Test doesn’t really install the application and run it. Test simply
copies needed files such as help files and DLL files to the \Temp
directory. As always, it’s good practice to select a pilot test group
for testing the installation before distributing the package to your
entire organization.
Run
The Run tool lets you
run the installation program on the reference computer. Run will test
the SMS Installer–generated file exactly as it will run on the target
computers. Run will install the application and make any changes to the
system that are required, including registry modifications.
Caution
If
you plan to run the installation on the reference computer, you’ll need
to remove the application (along with any registry settings that were
created or modified) that was installed during the repackaging process.
Otherwise, the installation might fail when it attempts to create or
write to directories needed for the installation. |
Script Editor
You
use Script Editor to edit the basic installation script generated by
the Installation Expert or to create or modify your own installation
script. Script Editor allows you to tune the installation script for
customization and optimization. You can also modify such items as file
locations, registry settings, and user prompts. You can also add many of
the functions that can be manually configured through Script Editor to
the script by configuring them in the Installation Expert. You can add
some functions only through the Script Editor window. For example, you
can configure uninstall support using either method, but you can
configure support for rollback (which enables you to remove patches
rather than uninstalling the application outright) only through Script
Editor.
Script Editor provides a
much higher level of control over the action of the script. Learning to
use this tool effectively takes a long time. It also requires an
intimate understanding of how the application’s installation routine
works—including what files and directories are modified, what registry
entries are added or configured, what external DLL support is required,
whether a restart is required, and what happens as a result.
Now that you have a working
knowledge of the SMS Installer tools, let’s look at how to use SMS
Installer to create the installation script.
Creating Installation Scripts
To begin the process of
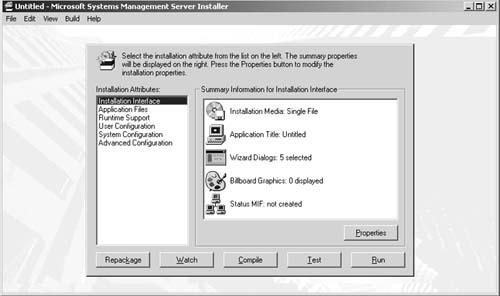
creating an installation script, start SMS Installer to launch the
Installation Expert interface, as shown in Figure 1.
We’ll
begin the process of creating an SMS Installer–generated executable by
running the Repackage Installation Wizard. In this example we’ll create
the Microsoft TechNet installation executable.
To create the installation executable, follow these steps:
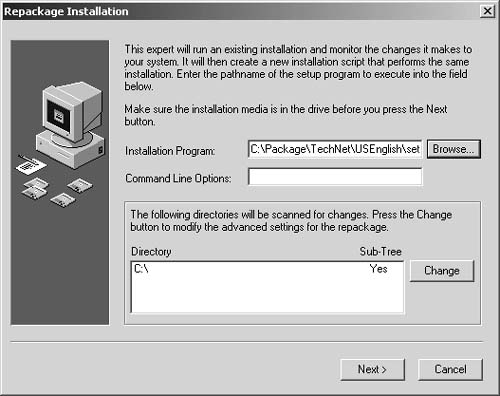
1. | In the Installation Expert interface, click Repackage to launch the Repackage Installation Wizard, shown in Figure 2.
|
2. | On
the Repackage Installation Wizard page, you configure the name and path
of the setup program used by the application for installation. You
might also need to add any other command-line arguments that the setup
program might need.
|
3. | In
the Directory list, configure any directories you want to be included
in the list of directories to be scanned during the installation
process. To add a drive or directory, click Change to open the Repackage
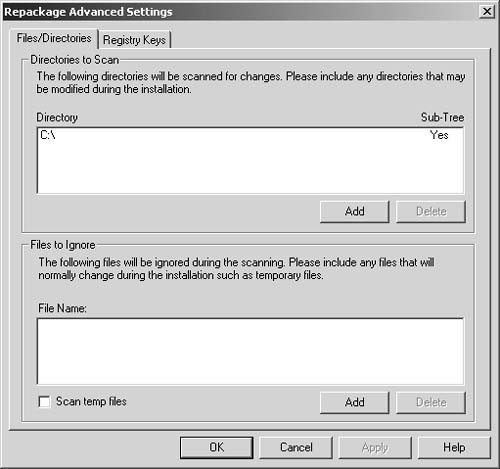
Advanced Settings dialog box, shown in Figure 3.
|
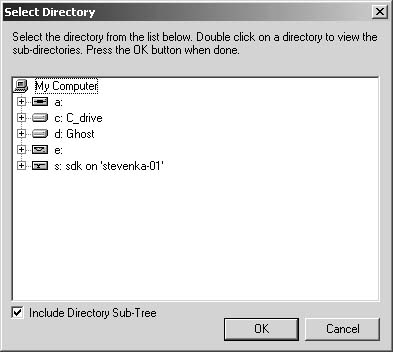
4. | In the Directories To Scan section of the Files/Directories tab, click Add to display the Select Directory dialog box, shown in Figure 4.
|
5. | In
the Select Directory dialog box, we can select the root directory or we
can select only the specific subdirectories we want to scan. Narrowing
the scan can save significant time during the repackaging process. As a
general rule, you don’t want to scan every directory if you know some
directories won’t be affected during the installation.
|
6. | When you have added all the directories you want to scan, click OK. The directories are added to the Directory list.
|
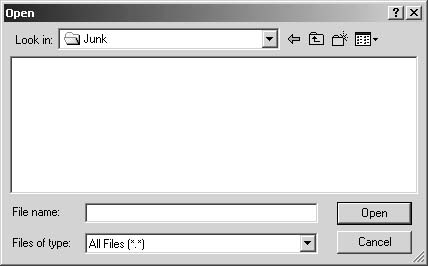
7. | Next,
we’ll configure the directories and files we want to ignore during the
scan process. Again, being selective here can improve the performance of
the installation process. In the Files To Ignore section of the
Files/Directories tab, click Add to display the Open dialog box, as
shown in Figure 5.
|
8. | For
this example, the C:\junk directory won’t contain any files pertaining
to our installation of Microsoft TechNet, so we can ignore this entire
directory. Select the C:\junk directory by double-clicking on it, and
then enter *.* in the File Name text
box to include all files in this directory. If you wanted to exclude a
specific file in a folder, select that file.
|
9. | Click Open to add the directory, or files, to the File Name list, as shown in Figure 6.
|
10. | You
can also specify whether to ignore scanning of any temporary files
during the installation process. To scan temporary files, select the
Scan Temp Files check box.
|
11. | To
specify the registry keys and values to scan or ignore during the
installation process, select the Registry Keys tab, shown in Figure 7.
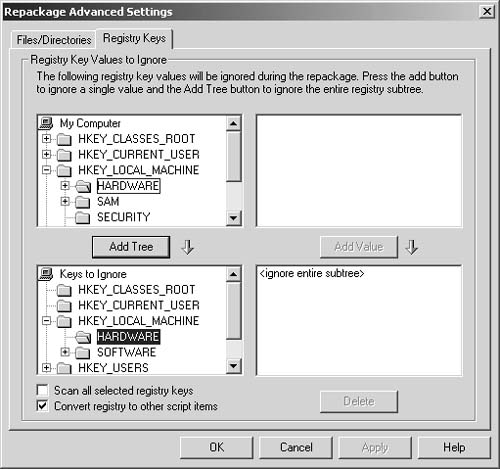
Caution Selecting
registry keys to scan or ignore can be a tricky business. Be especially
careful not to overlook or choose to ignore a key that’s altered during
the setup process—doing so would invariably render your installation
script worthless. On the other hand, the installation can change
something such as a DHCP address setting by releasing and renewing an IP
setting during a system restart, which is unrelated to the installation
itself and shouldn’t be included in the installation script. Your best
bet is to get to know the keys that your installation will affect and
once you have created the final script, test, test, test! |
|
12. | The
Registry Keys tab contains four panes. The top two panes represent the
current registry settings read from the reference computer. The lower
two panes represent the registry settings that are to be ignored. In the
top-left pane, under My Computer, select the registry trees or values
you want to ignore. To add the registry subtree to the list of subtrees
to ignore, click Add Tree. To add a key you want to ignore, select the
key in the upper-right pane, and then click Add Value. The lower-left
pane shows where the selected keys are located on the reference
computer; the lower-right pane lists their values. Select Scan All
Selected Registry Keys to scan for hardware registry entries to ignore.
Select Convert Registry To Other Script Items to convert ODBC changes
and installation of services to the Install ODBC Driver, Configure ODBC
Data Source, and Create Service script items.
|
13. | Click
OK to return to the Repackage Installation page, and then click Next to
begin the scanning and installation process of our application, as
shown in Figure 8.

During
the installation phase, the Repackage Installation Wizard will run
Setup.exe with any switches you provided in the initial configuration of
the wizard The setup will run exactly as it normally does. Remember
that you’re providing the installation options that will be used during
the actual setup of the application on the target computers.
|
14. | After
the Repackage Installation Wizard has completed the setup of the
application, click Next to rescan the directories and registry settings,
as shown in Figure 9. The wizard will compare the system image before and after the installation of the software.
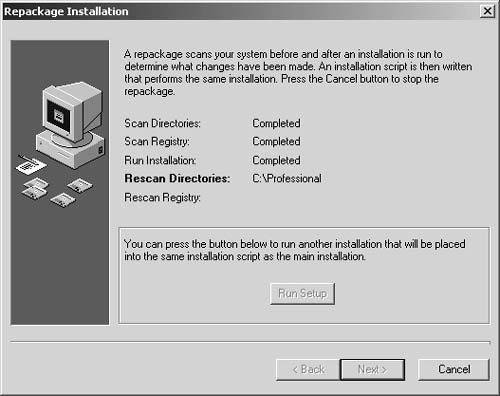
Note You
might also want to add application setups during this repackaging
process—for example, you might want to distribute several applications
within one silent installation process. To accomplish this, click Run
Setup to run the next setup and add the additional software. Keep in
mind the size of these packages as we begin to install larger, more
complex applications or multiple applications in a single SMS
Installer–generated executable. |
|
15. | When the rescan of the directories and registry keys is complete, click Finish to complete the repackaging process.
|
At this point,
clicking Compile in the Installation Expert interface will generate a
basic script that, while perhaps not very elegant, might certainly be
adequate for distribution.
You could use the Installation Expert to verify the installation
configuration that was created during the repackaging process and then
modify and customize the script to meet the particular needs of your
users and organization.
Caution
If
the setup routine for the application you’re repackaging requires a
system restart, SMS Installer won’t automatically restart the
repackaging process. You’ll need to restart SMS Installer and the
repackaging process and then continue repackaging. |